Pickled red onions (cebollas encurtidas)
Lime brings the tang, and onions do the tango.
To kick off our fermentation series, Anthony and I shared our basic recipe for sauerkraut, which is on our table pretty much daily. Last week we gave you a Q&A interview with fermentation expert Kirsten K. Shockey. Today we’re capping off our spotlight on the fine art of fermentation by sharing a recipe from Fermented Vegetables1 that hits culturally close to home for Anthony, as his late mother was born in Chihuahua, Mexico, and on that side he is of both Spanish and Zapotecan heritage.
Cebollas encurtidas, or pickled onions, originated in Ecuador and reminds me of the tastes of Miami, Florida, where I lived for two years. We know Anthony’s mother, “Amazing” Grace, would have loved it.
Thanks to Kirsten Shockey and Storey Publishing for permission to share this tangy, mouthwatering treat—perfect as a condiment on meat, tacos, or just topping cheese on a cracker—with Brunette Gardens readers. While the lime zest is listed as optional below, we can’t imagine this ferment—or even life, for that matter—without it! Here’s an excerpt from Fermented Vegetables. - Lisa
Cebollas encurtidas (pickled onions)
yield: about 1 quart (946 ml)
This recipe for vinegar-pickled onion has its origins in Ecuador. Traditionally it’s made with cebolla paiteña, a smaller and spicier onion than those we get in North America. Our fermented adaptation is delicious.
3 red onions or shallots, sliced
1 tablespoon (6 g) lime zest (optional)
Juice of 3 limes
1 teaspoon (6 g) unrefined salt
Trim the onions by making shallow, cone-shaped cuts on both ends. Peel away the papery outer layers of skin. With a knife or mandoline, thinly slice the onions crosswise into rings.
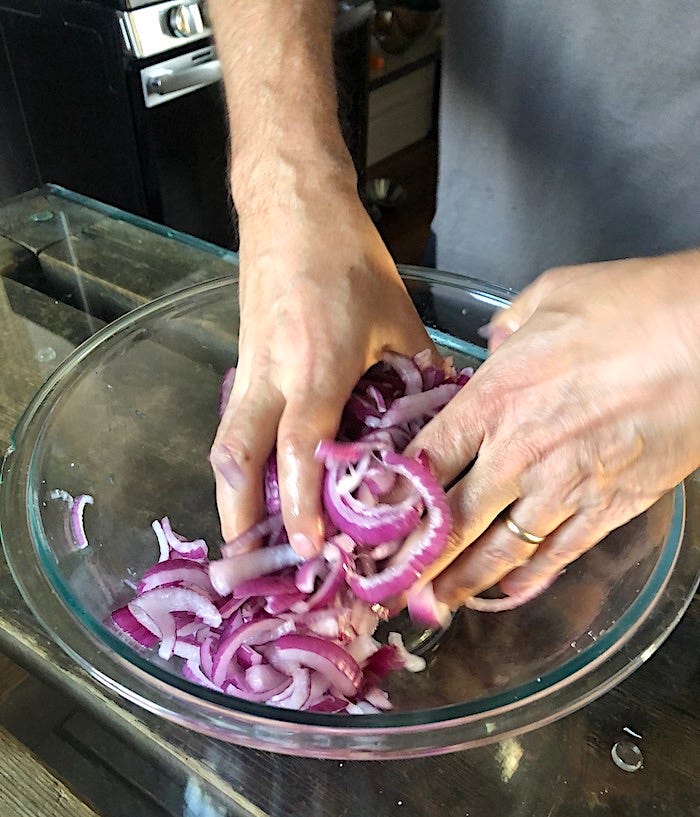
Transfer the onions to a large bowl and sprinkle in 1 tablespoon of the salt, working it in with your hands. Then taste. You should be able to taste the salt without it being overwhelming. Add more salt as needed. When it’s ready, mix in the lime juice and zest if using.
Pack the mixture into a crock or jar, pressing as you go.
Place a grape leaf or parchment paper on top. Follow the instructions for your fermentation vessel. For a jar, if using the burping method, make sure there is little headspace and seal lid tightly. Burp daily or as needed. Alternatively, top the ferment with a quart-size ziplock bag. Press the bag down onto the top of the ferment and then fill it with water and seal.
Set your fermentation vessel on a plate in a spot where you can keep an eye on it, out of direct sunlight, and let ferment for 7 to 14 days. Check regularly to make sure the onions are submerged, pressing down as needed to bring the brine to the surface. The onions are done when they are translucent, have lost their sharp bite, and are pickle-y tasting, without the strong acidity of vinegar.
To store, transfer to smaller jars, if necessary, and tamp down. Pour in any brine that’s left. Tighten the lids, then store in the fridge, where the onions will keep for 18 months.
While Kirsten’s method works well without having to buy special equipment, we find these fermentation kits to be very helpful in all our projects. That’s where you’ll find the “pickle pipe” and cool soda-glass weights pictured in the photos here.
Feeling ferment-friendly? Perhaps you’d like one of these posts.
Are these red onions the most beautiful ferment you’ve ever seen? What did you think of this series on fermentation?
For paid subscribers only: A printable PDF of the above recipe.


